This blog post is the second of three in the series, following Part 1 about the requirements for the server and the choice of hardware. Part 3 looks at software installation.
Contents of this blog post
- Hardware upgrades
- Installation of macOS
- Initial network setup
- Accessing the Mac mini and file sharing
- Dynamic DNS
After having purchased all the necessary hardware, the next step was to install the two hard disks in the Mac mini – to remove the 500Gb hard disk in it already, replace that with the 2Tb Seagate drive I purchased, and add the Samsung 512Gb SSD as the second drive. To do this I followed the iFixit “Installing Mac mini Late 2012 Dual Hard Drive Kit” Guide.
The guide is listed as moderate difficulty, and takes 1-2 hours – that is about right. In comparison to some repairs I have done that involve ungluing things, or seemingly impossible disassembly, this one presents no really complicated challenges. But the Mac mini is as tightly assembled as a laptop, and some of the parts and amount of space to work in are pretty small. To do this repair you need T6 and T8 Torx screwdrivers, a Mac mini logicboard opener tool, and a small hex (Philips) screwdriver. Some heat paste is optional for the additional step. Most if not all of these tools should be supplied with your Mac mini second drive kit mentioned in Part 1 (they were with the one I bought).
These are things to especially take note of, in the order you have to perform them.
Step 15 when disassembling needed quite a lot of force. In Step 18 the covering of the old hard disk is rather fragile – be careful when removing this and applying it to your new drive. The grommets supplied in my second drive kit were a little too thick to allow Step 36 to be accomplished without having to apply too much pressure to the plastic frame – I sliced two grommets in half to make them thinner to accomplish this step. Getting the second drive cable folded the right way in Step 32 is a bit of a pain – you can solve this later when reassembling by re-inserting the logicboard (Step 15) before you re-insert the second hard disk, and making sure your cables all line up with the sockets on the logicboard. Also on Step 15 when re-assembling, re-insertion of the power supply corner was complex to get right – attach the power cord (not powered!) while the plastic back still 5mm out of the Mac mini to help you line everything up in that corner. You then need to pay extra attention to Step 8 of the iFixit guide when re-assembling – getting the hard disk in exactly the right position to complete this step is not as easy as it looks.
As my Mac mini had obviously never been taken apart or serviced since purchase, I also opted to disassemble the heat sink so as to clean the vent and to apply new heat paste. The iFixit guide “Mac mini Late 2012 Heat Sink Replacement” explains that. The only issue was the screws next to the WiFi card on my model had multiple covers that had to be removed – these are not shown in the iFixit guide.
So the machine was then screwed back together and ready to go…
I always do this from scratch, using a USB stick for speed. I use the free DiskMaker X to make the bootable USB stick. Nothing special at this stage – macOS 10.15.4 Catalina is installed and running. So the Mac mini is ready to go. Let’s connect it to the network!
This is a diagram of the local network – only the parts that are relevant for the server project are shown:
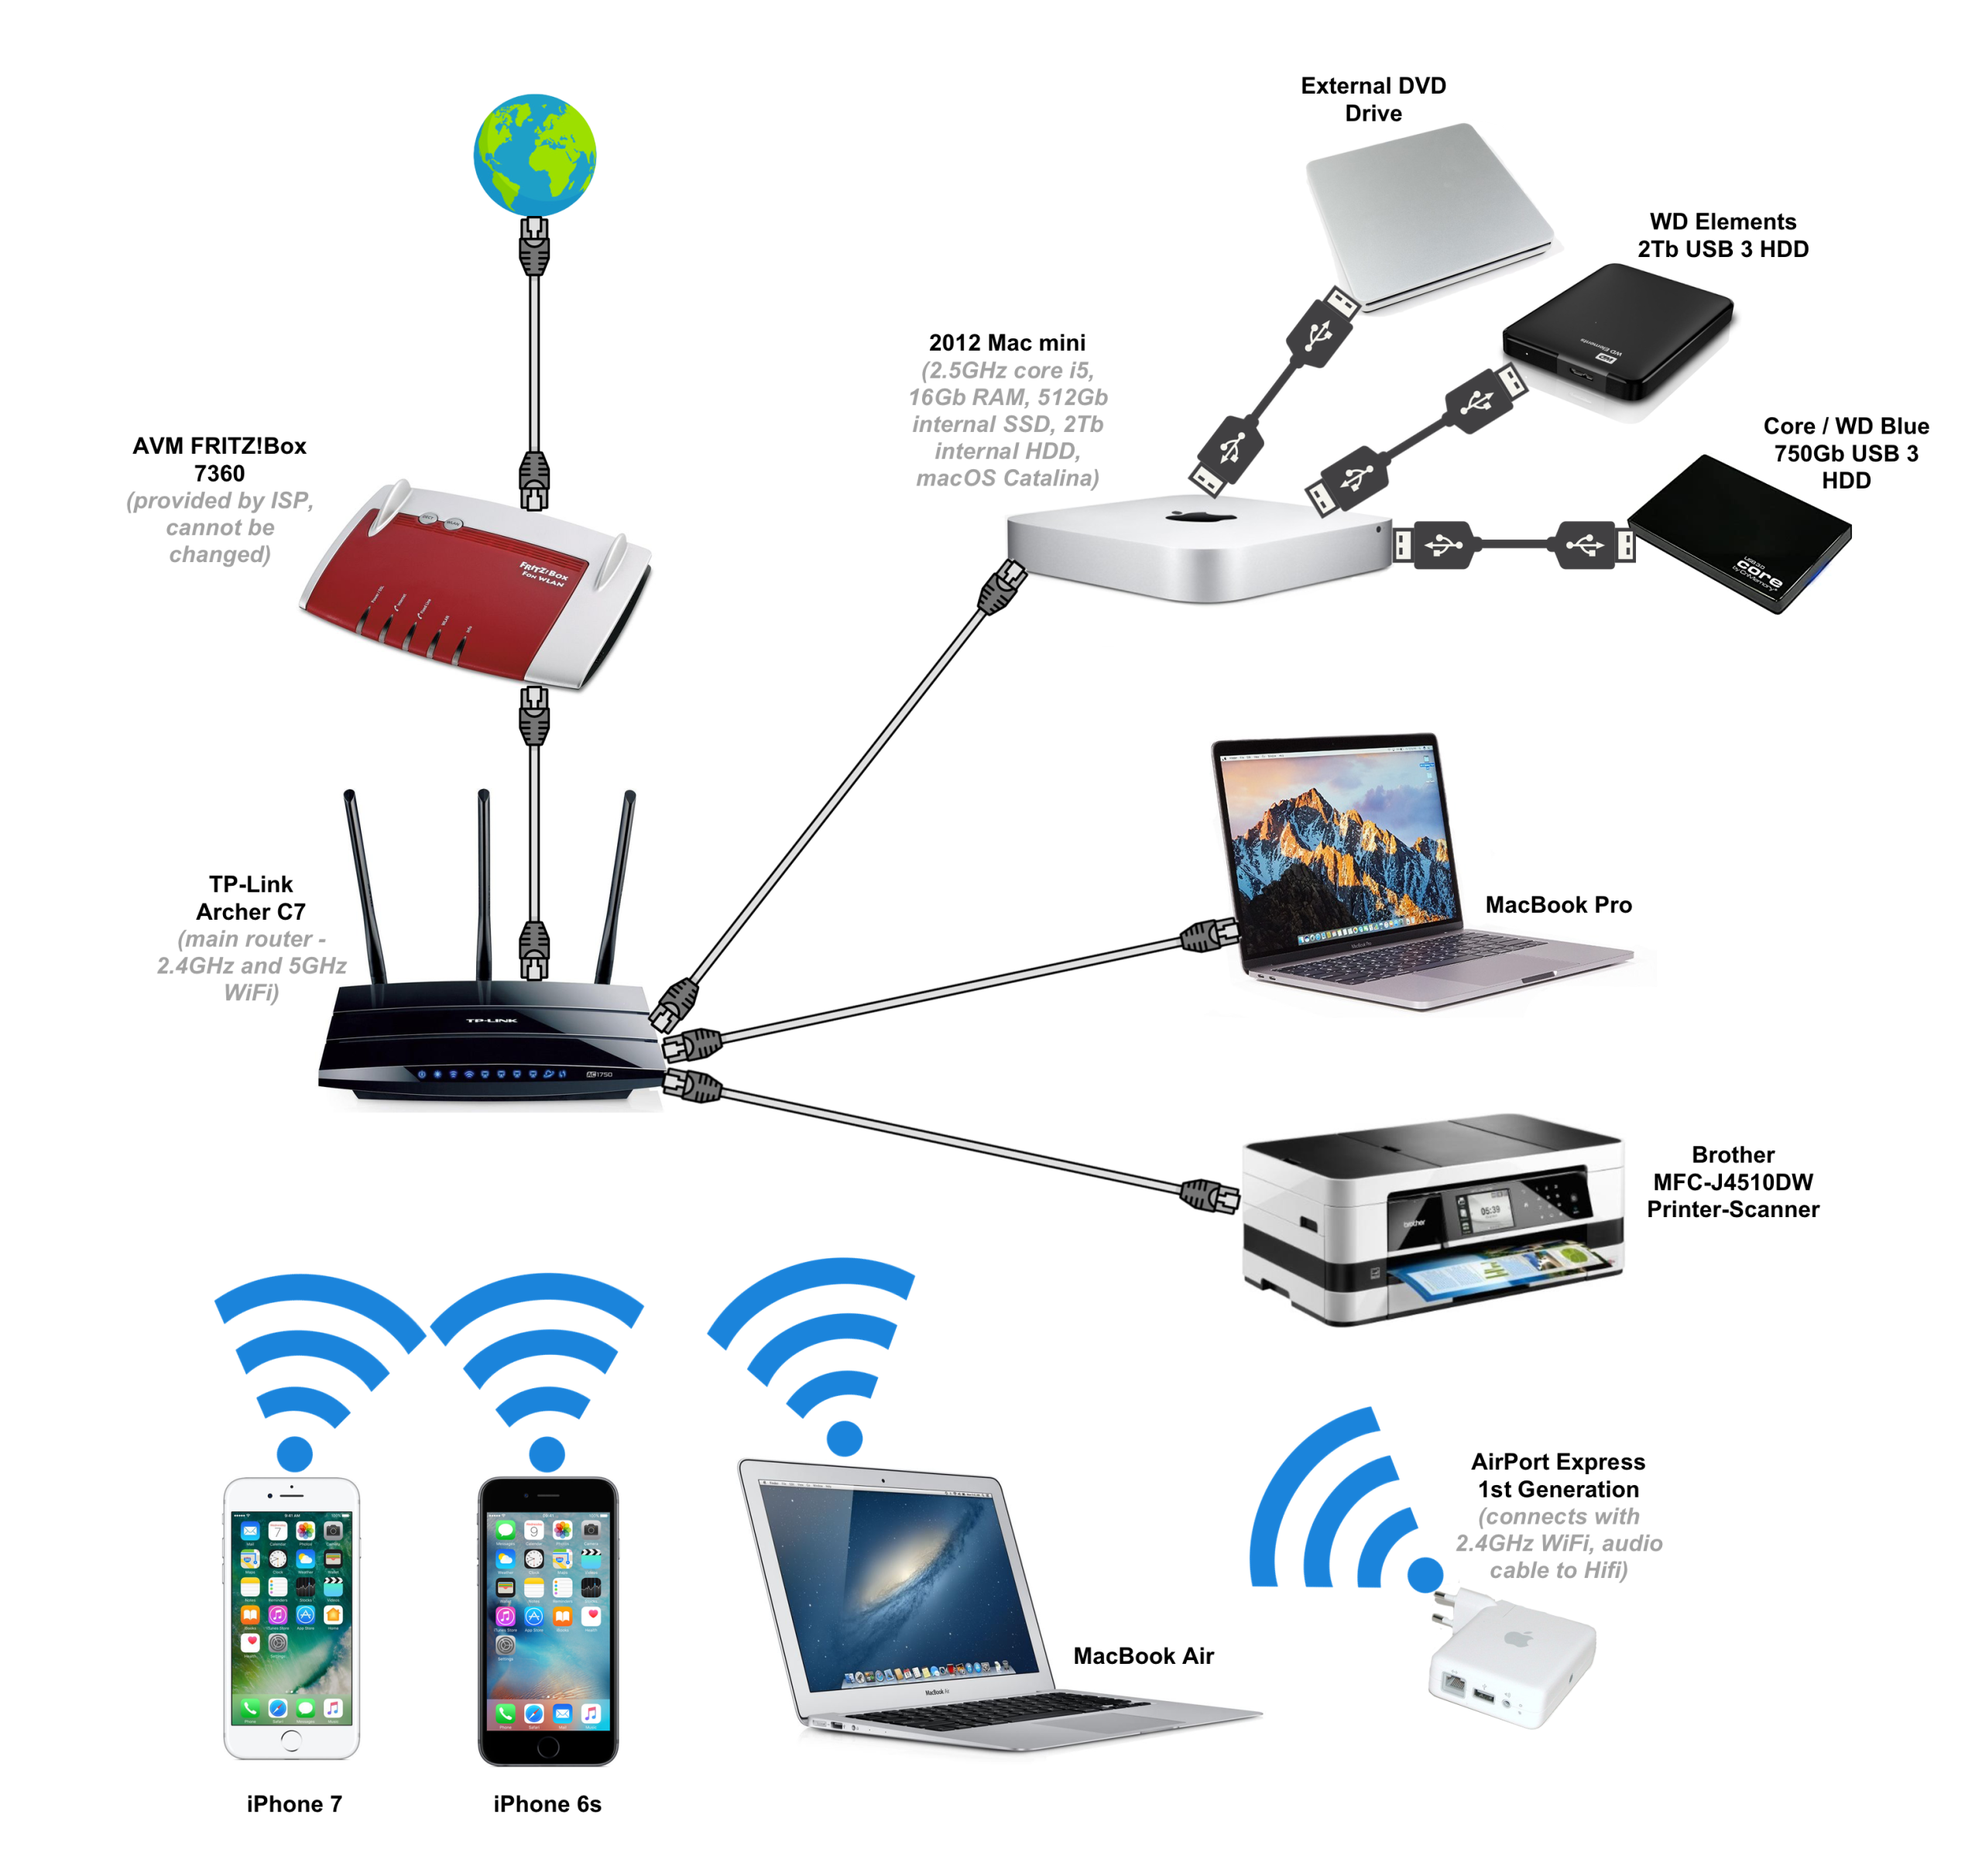
The two router setup is not ideal by any means, but there is no way to avoid it currently due to my ISP – the FRITZ!Box 7360 only has 2.4GHz WiFi and there is too much interference in the building, so I had to buy a further router some time back. The Archer C7 is a super and reliable router – it is still Wirecutter’s best budget pick.
There were two problems right at the start.
Firstly, to make this whole system work both the Archer C7 and the Mac mini would both need to have the same IP addresses on the local network all the time, not be allocated different local IP addresses every time routers (re-)started. The FRITZ!Box allocates the same local IP to every device every time anyway, but the Archer C7 does not – you need to go to the TP-Link settings “DHCP” > “Address Reservation” to make sure the Mac mini gets the same local IP address every time (assigned for each MAC Address).
Second there was a problem with the public IP address, or the lack of one. I know I have no fixed IP address from my ISP, but it turned out that even my dynamic IP address was not public – this was due to the CgNAT setup my ISP was using. You might have this problem if the IP Address shown in your router settings (here it was the IP address shown when logging into the FRITZ!Box) is different to the one shown if you use a service like whatsmyip. A quick support request to my ISP solved this – they allocated me a public dynamic IP address.
7. Accessing the Mac mini and file sharing
As shown above, there is no monitor attached to the Mac mini. So how do you access it? The answer on the home network is very simple – you use Apple’s Screen Sharing application. This guide explains how to do it. So now I can administer everything on the Mac mini from my MacBook Pro. This even applies if the Mac mini has been powered down and powered up again – I can even Screen Share before it has been logged in. The Mac mini has also been configured to re-boot after a power outage – this explains how to do that.
But what about when I am not on my home network? I was not too keen to pay €89.99 for Apple Remote Desktop. The solution here is instead to use Chrome Remote Desktop – and that even has a iOS app. It’s a breeze to use.
File sharing when on the same network is simple to set up – you just use File Sharing in Sharing in System Preferences, and set what files and folders you wish to share locally. That solves the issue for collaborative file editing and sharing on the home network.
For file sharing when not at home, macOS has SFTP built in (explained here), so that will be the solution for file transfers to and from the Mac mini, even from afar. But how then do I find the Mac mini, when the IP address provided by my ISP is dynamic? Read on…
This is a really good overview of what Dynamic DNS is, and how it works. But which provider do you use, and how do you keep your costs low?
Dyn (now owned by Oracle) was the market leader for this, but it now is a subscription only service – $55/year. No-IP seems to be the most popular service, and also offers dynamic DNS for free – providing you login once a month to re-activate your services with them. Their service and help pages are very comprehensive, so if you need an introductory Dynamic DNS system I would start with them. However I stumbled upon this system to use Google Domains (and hence my own domain name, rather than a sub-domain as with No-IP) for Dynamic DNS… but Google Domains does not work in Germany yet. And that led me to my domain name registrar – EuroDNS. It turns out they too offer Dynamic DNS. So an old domain name I have with them will be directed to the Mac mini home server.
But how do I then update the IP address? EuroDNS offers java based EuroDynDNS Applications, including for macOS, that I could run on the Mac mini. But a more elegant solution is to configure this on a router. It took some messing around and trial and error, and reading this about how to configure the FRITZ!Box 7360 for this purpose, but it now works – every time my IP address changes, my router notifies EuroDNS of the change, and the IP Address listed in the A-Record for the domain I am using is also changed.
This is the FRITZ!Box configuration
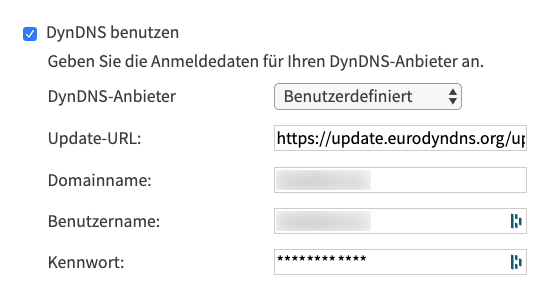
Update URL takes the form: https://update.eurodyndns.org/update/?hostname=mydomainname.abc&myip=<ipaddr>
The fields are filled as follows – you need to fill “Domainname” even though the domain name is also in the Update-URL. Domainname is mydomainname.abc, and Benutzer and Kennwort are the login details for my EuroDNS Account.
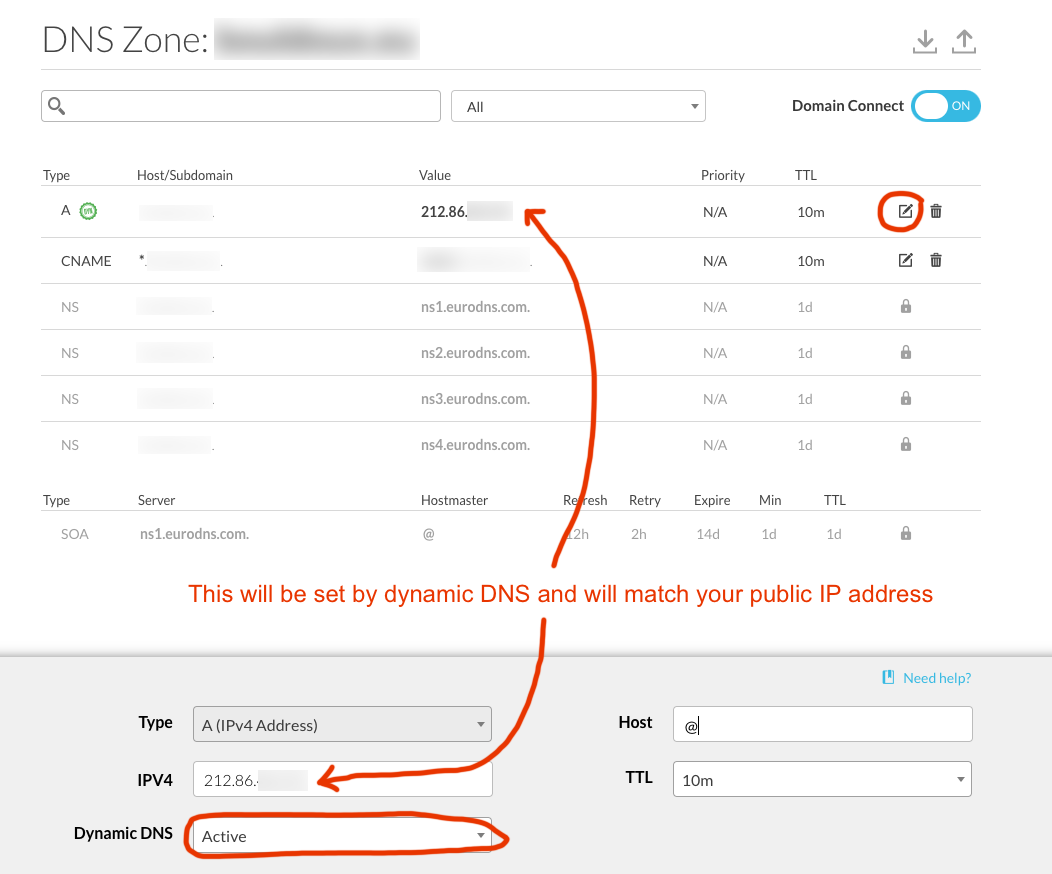
Then in EuroDNS you need the Name Servers to be set to EuroDNS defaults, and then configure the domain name as shown:
Lastly Port 22 (the default SFTP Port) needed to be forwarded from the FRITZ!Box to the Archer C7, and from the Archer C7 to the Mac mini. Now I can make SFTP connections to my Mac mini when I am away from home. You can use whatever SFTP client you wish for this – I have been a devotee of Transmit (details of the subscription models here) on macOS for years, and when combined with Fuse it makes connecting to SFTP Servers a breeze right in Finder. On an iPhone I would need to search for a SFTP App – Secure Shellfish looks like a decent option, but that is going to be a nice to have in the future.


After having purchased all the necessary hardware, the next step was to install the two hard disks in the MacAs for photo sync, I plan on creating a user account on the server, setup iCloud photo sync for every user to store all photos locally in original quality. That way I can keep my entire photo library in iCloud, save space on my devices, and still keep a current backup of it all.
https://youtubemp3song.com/
Sorry to be “necroing” this old post. I’m in the process of replacing my old Dell T30 home server with a Mac Mini M1, and was looking for inspiration. I’ll be getting the 256GB version and adding a Thunderbolt SSD enclosure [2] for storing user accounts.
Anyway, I have a few comments:
For file sharing outside your own network, it may be worth your time to look into Resilio Sync [1]. It offers file synchronization without opening any firewall ports, and works on Mac/Linux/Windows/iOS and Android.
Another option would be to setup a VPN, and use that for file access. A VPN would also take care of remote access.
I use both methods.
As for photo sync, I plan on creating a user account on the server, setup iCloud photo sync for every user to store all photos locally in original quality. That way I can keep my entire photo library in iCloud, save space on my devices, and still keep a current backup of it all.
I currently have a Linux server for my stuff, but when moving to a MacOS server it means that suddenly Backblaze unlimited backup is within reach (€50/year, 1 device, unlimited space). Assuming my backup drive lasts 5 years, the cost of backblaze and local backups will be just about the same, only I don’t need to worry about spinning rust.
Anyway, just my $0.02
[1] https://www.resilio.com/individuals/
[2] https://www.startech.com/en-us/hdd/s252bu313r
Pingback: My Homepage
Thanks for the article and sharing your project.
How did you format your internal hard disks? Do you have two separate drives or did you create a Fusion Drive?
Did you create a Fusion Drive before installation of macOS or did you just install macOS on the SSD and use the HDD as data grab?